Showing posts with label pennants. Show all posts

Monday, December 9, 2013

We Wish You a Merry Christmas! (Part Two - Felt banner)

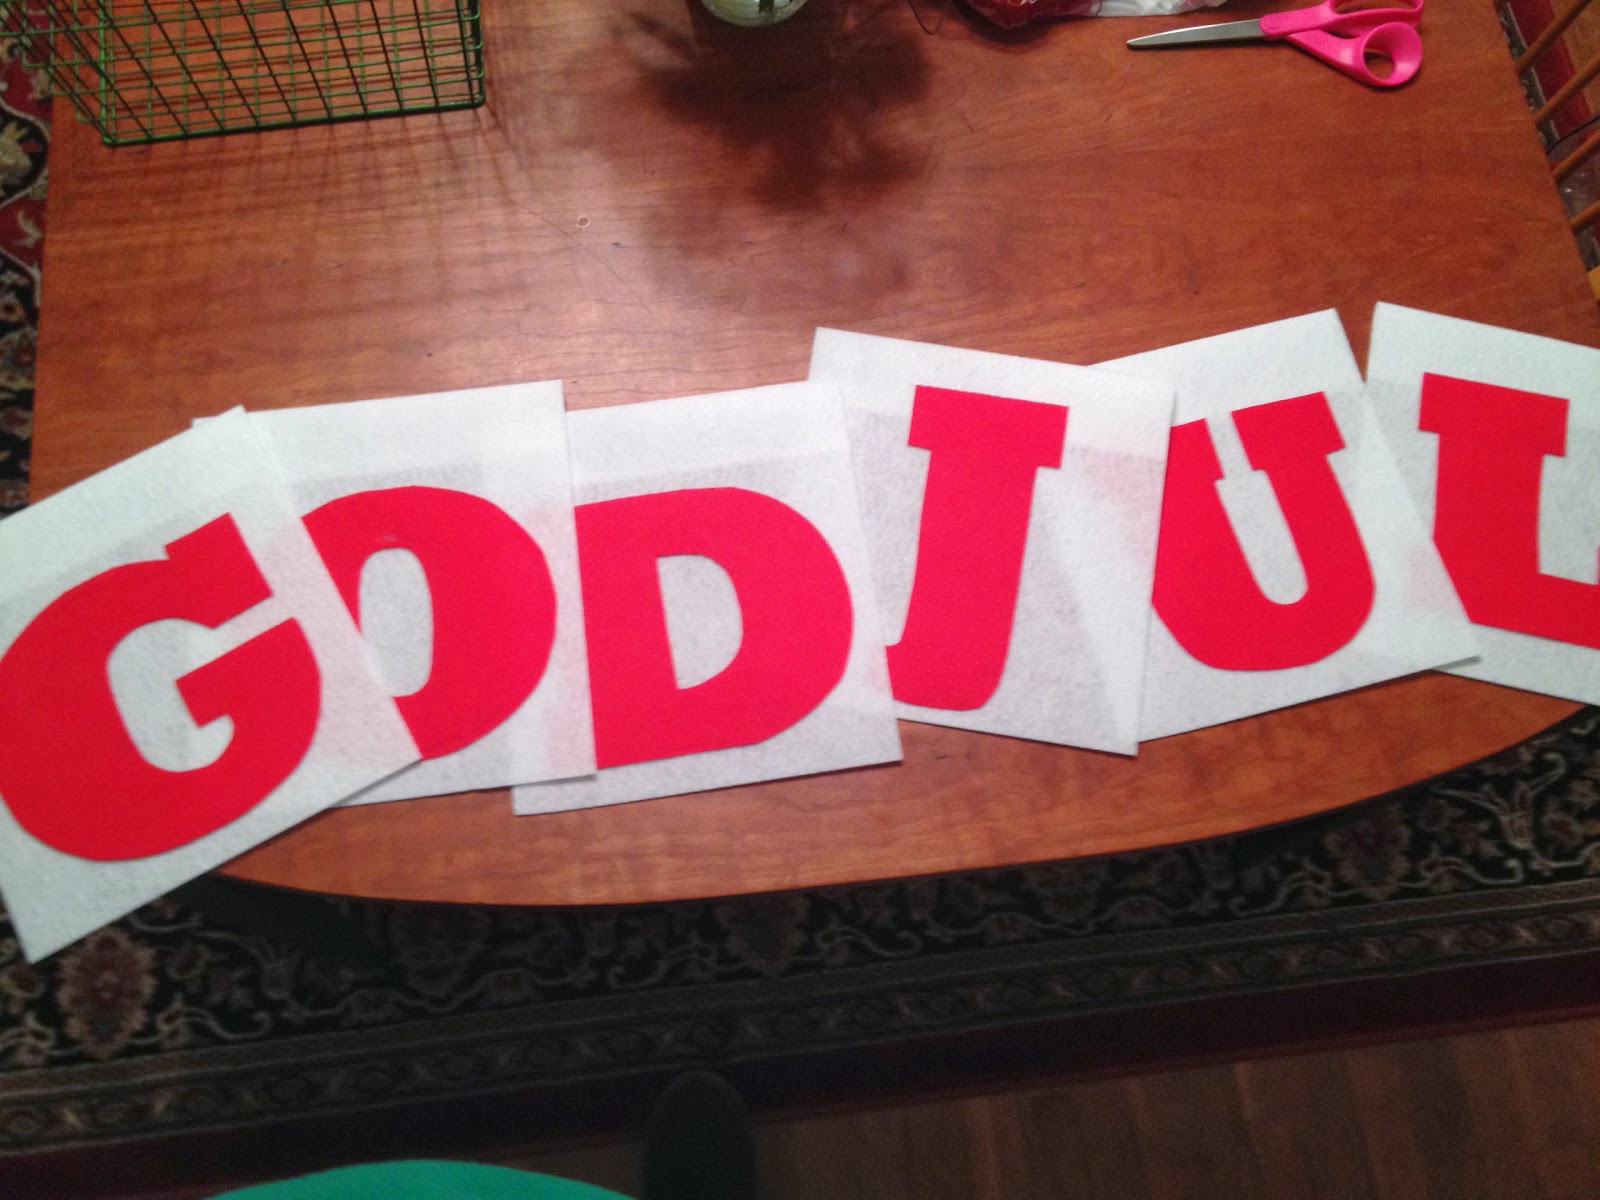
If you saw my part one post in the Christmas series, you may have noticed the God Jul felt banner that I created for the church entryway wall. The project was SO simple, that I was tempted to make a second one for home, but realized that I was OUT OF WHITE FELT! Oops! 

MATERIALS:
White felt (6 sheets 9x12 sheets or cut the 12x18 sheets in half)
Red felt (I used 1.5 12x18 sheets)
Stencils
Tulle ribbon or other ribbon of choice
Glue (Hot glue was great!)

I printed out the font I wanted from Microsoft Word, and selected Rockwell at size 710! I would have used a much smaller size for home, but wanted these to be large and fill a big wall.


I then cut my stencils and traced them backwards onto the red felt so that when I cut the felt, the front would be free of markings.   

I then cut my 12 inch by 18 inch white felt in half. Using the hot glue, I folded about one and half inches of felt down to make a casing. I ran hot glue along the 9 inch edge and folded the edge down to seal the casing.  Complete this step on all of the pieces of white felt (you should have 6 matching rectangular pennants with a casing at the top). 


I then took the red felt letters that I had previously traced and cut, and using more HOT GLUE! attached them to the white pennants.  I did my best to center them left to right, but kept them a bit lower than centered top to bottom.  That was just a personal choice! Do what YOU want! 

Once I had all of my letters secured, I strung them with red tulle ribbon from Jo-Ann Fabric.  It's about six inches wide, but scrunched up when I threaded it through the casings.  


I tied bows on other side of the banner prior to hanging it on the wall.  The fluffy bows were great for hiding the push pins and gave it just a bit more flair!


GOD JUL or Merry Christmas to everyone! Keep watching for part three! See you soon!


Monday, September 23, 2013

Socializing with Pie!

Oh goodness... what was I thinking?!?! Somehow I got it in my brain in July that I would have the energy and patience to plan a pie social fundraiser for the month of September at church! Because teaching 4th and 5th graders during the week, middle schoolers on Sundays, being the church secretary, and union president wasn't enough to fill my plate! Haha! Good thing I like crafting, organizing, and eating pie! 

I enlisted the wonderful Lutheran folks' help to take care of the pie baking portion of the activity.  30 pies were on the sign up sheet and I'm pretty sure there were at least 35-40 pies that actually arrived at the social! So of course the 30 pie labels I made were insufficient! But that's a good problem to have! The labels were so fun to make, and I realized they would be really cute as place cards for a party! 


I started these tags by simply cutting blank cards in half.


Each card received a color block base, and then my new favorite crafting find! The Martha Stewart Home Office Avery Labels! 


Each piece was just placed in the middle of the next. And then I attached a button or two for pizazz, and because I just really like using buttons! 


As if making all the little tags wasn't enough prep and decor, I decided to make a banner too! I used cardboard letters as stencils for my EAT MORE PIE pennants.  Each pennant was a 12" by 6"  rectangle  that I put a one inch fold on at the top to use as a hanger.  


I, of course, continued the button theme! 


And used clothespins to secure the pennants to the tulle.


A little swag detail! And a couple bows on each end! Ta-da! 


To make a long post even longer, I incorporated a silent pie auction to the event.  Each pie received a label and a bid sheet on the auction table. Some pies sat on cake stands, baskets, and tiers to add some dimension to the table and gave me more room to fit more pies!   


I have to give a huge shout out of thanks to my parents, Aunt Kathy, and Craig for all of the help setting up and taking down. And a huge thanks to the pie makers, ice cream donators, and those that helped by washing dishes, moving tables, and cleaning the kitchen! There is no way that the pie social and auction would have been so successful without all of the helping hands! And a thanks to Craig for sharing his journey to China and Mongolia with us as the program portion of the event! 

I leave you with a couple pictures of some happy pie eaters! :) 


Sunday, February 12, 2012

Bouncing Baby Fun!

Enjoy the picture ideas and basic captions for baby Hannah's shower that I helped my cousin Amy decorate for.
Hannah stamps on punch cups!
Mom's seat at the table, stamps on craft wrap.
Jars and plates make for a simple, elegant cupcake stand!
Doilies mixed as a runner, with jars of treats and flowers.
Tables, pink butcher paper covered with craft paper.
Lanterns filled the window, and pennants draped the wall!
My cousin Amy created adorable onesies with iron-ons and pinned them on a clothesline.
The clothes line! HANNAH!
Welcome to the world baby Hannah, and congratulations to Jeremy and Brittany!
And thank you Amy, for letting me share your creative and adorable ideas! 

Saturday, July 2, 2011

Thank you very much!

I am a little slow on getting these up, but I created pennant style thank you cards for my students who gave me gifts at the end of the year.  I choose cards in bright colors (from a precut mat stack book) and then selected both pattered and solid paper for the pennant flags that complimented the card colors.  I then free handed small triangles from the paper.  I used the first one as a guide for the rest so they were somewhat similar.  The first card I created was the green one, featuring the brown trim, but I was not thrilled with the result so I opted to string the flags on an invisible line! Once each card was glued together, I labeled the flags with brown Sharpie, mixing up the fonts for each card.  I let the cards dry under a press so as to keep the pennants from curling on the edges and voila! A cute and simple card! These would make adorable birthday cards, baby announcements or shower gifts, party invites, you name it!

Notice the different fonts.


Finished pieces.


All together, notice the brown trim on the green card. Decided it was too bulky and didn't sit right. Perhaps some thick thread would be more appropriate in the future. Or a hand drawn line. Next time...